

To set up a Google Ads campaign correctly, create a Search campaign with the “Leads” or “Sales” objective, disable Search Partners and Display Network, set location targeting to “Presence only,” use Max Conversions bidding, and restrict keywords to phrase and exact match. The reason most beginners waste money isn’t bad keywords — it’s that Google’s default campaign settings quietly route your budget to low-quality placements before you ever write a single ad.
I’ve managed millions in monthly ad spend across 100+ client accounts, and the pattern is identical every time: a new advertiser launches with Google’s recommended defaults, burns through $500 in a week, and concludes that “Google Ads doesn’t work.” It works. The setup just sabotaged you.
Here’s the exact step-by-step process to build your first Search campaign without the expensive mistakes.
Why Google’s Default Campaign Settings Drain Beginner Budgets
Google’s 2025 campaign builder is engineered for one thing: getting your ads live as fast as possible. That sounds helpful until you realize “fast” means auto-enabling settings that expand your reach into placements you never asked for.
Three defaults cause the most damage:
- Search Partners + Display Network are auto-checked, routing your Search budget to random third-party websites and app banners that generate accidental clicks.
- Location targeting defaults to “Presence or Interest,” meaning someone in another country who once Googled your city can see your ad.
- AI Max (Google’s newest automation layer) can override your keywords, ad copy, and landing pages entirely.
The real catch is this: none of these settings are labeled as “optional money drains.” They’re presented as neutral recommendations. Your job during setup is to systematically disable every default that expands reach without improving intent.
Step 1: Campaign Objective and Type Selection
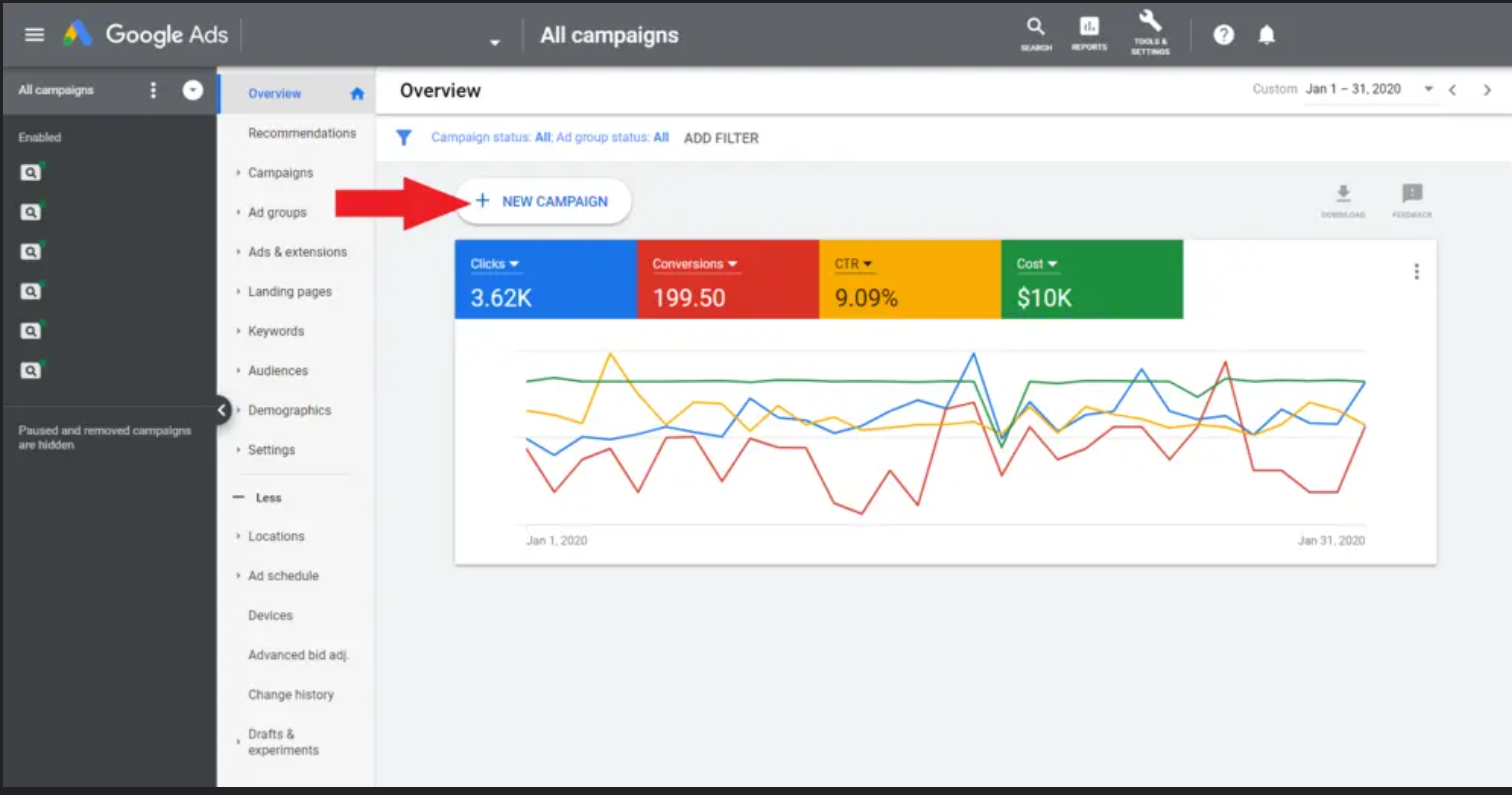
Navigate to Campaigns → + New Campaign. Google will immediately ask you to choose an objective.
Here’s the truth most guides won’t tell you: the objective you select doesn’t directly control performance. It mostly determines which settings Google shows or hides during the build. A “Sales” campaign and a “Leads” campaign with identical settings will perform identically.
That said, here’s what to pick:
- If you sell products online → Choose Sales.
- If you generate leads (service business, local business, B2B) → Choose Leads.
- If you want full control → Choose Create a campaign without a goal’s guidance. This unlocks every setting so nothing gets hidden.
Do not choose “Website Traffic.” That objective optimizes for clicks, not conversions, and will attract low-intent browsers who cost you money without filling your pipeline.
For campaign type, select Search. Ignore Performance Max, Demand Gen, Display, Shopping, and Video for now. Search captures the highest-intent users — people actively typing what they need into Google — and it’s the only campaign type where you control every keyword, bid, and placement.
When prompted for conversion goals, remove any old or irrelevant conversion actions. Keep only the one that matters: your lead form submission, your purchase confirmation, or your phone call tracking event.
Step 2: Network, Location, and Audience Settings
This is where the budget bleeding starts if you’re not paying attention.
Networks: Uncheck both Search Partners and Display Network. Search Partners includes third-party sites that license Google’s search results, and the traffic quality is inconsistent at best. Display Network mixes banner ads into your Search campaign, which is a fundamentally different format with fundamentally different intent. Get your Search campaign profitable first. Test these networks later as separate experiments.
Locations: Enter your target geography (city, county, or zip codes). Then — and this is the step most beginners miss — click Location Options and switch from “Presence or Interest” to “Presence: People in or regularly in your targeted locations.”
The default “Presence or Interest” setting lets Google show your ad to anyone who has ever shown interest in your area, even if they live 2,000 miles away. For a local carpet cleaner in Fort Wayne, Indiana, that means someone in California who once searched “Fort Wayne hotels” could click your ad. Switch to Presence only.
Audience Segments: Add 2–3 relevant segments (homeowners, in-market for cleaning services, etc.) and set them to Observation, not Targeting. Observation collects data without narrowing your reach. Targeting restricts your ads to only those audiences, which is too limiting for a new campaign.
Ad Schedule: If your business only answers phones Monday through Friday, 7 AM to 5 PM, set that schedule now. There’s no reason to pay for clicks at 2 AM on a Saturday if nobody’s going to answer the phone.
Step 3: Bidding Strategy — Max Conversions vs. Manual CPC
The best Google Ads bidding strategy for small business accounts launching their first campaign is Maximize Conversions without a Target CPA.
I know that contradicts some advanced advice. In my full bidding masterclass, I actually recommend Manual CPC or Max Clicks for experienced advertisers who want granular control. But you’re not there yet.
Here’s the logic:
- Max Conversions tells Google to find as many conversions as possible within your daily budget. It’s the simplest way to let the algorithm learn what a converting user looks like for your business.
- Do not set a Target CPA yet. You don’t have enough conversion data to tell Google what a reasonable cost per acquisition is. Setting one too low will throttle your impressions to zero.
- Ignore the “Customer Acquisition” setting. It’s designed for accounts with established customer lists and lifetime value data.
When to reconsider: If your campaign launches and you’re getting zero impressions after 48 hours, switch to Max Clicks with a manual CPC bid cap. This forces Google to enter auctions it was skipping. Once you accumulate 30–50 conversions, you can graduate to Target CPA.
Google Ads Masterclass (2026) | Complete Google Ads Training Course
Step 4: Keyword Research and Match Type Strategy
Your keyword strategy determines whether your budget reaches buyers or browsers. Two decisions matter here: which keywords to target, and which match types to use.
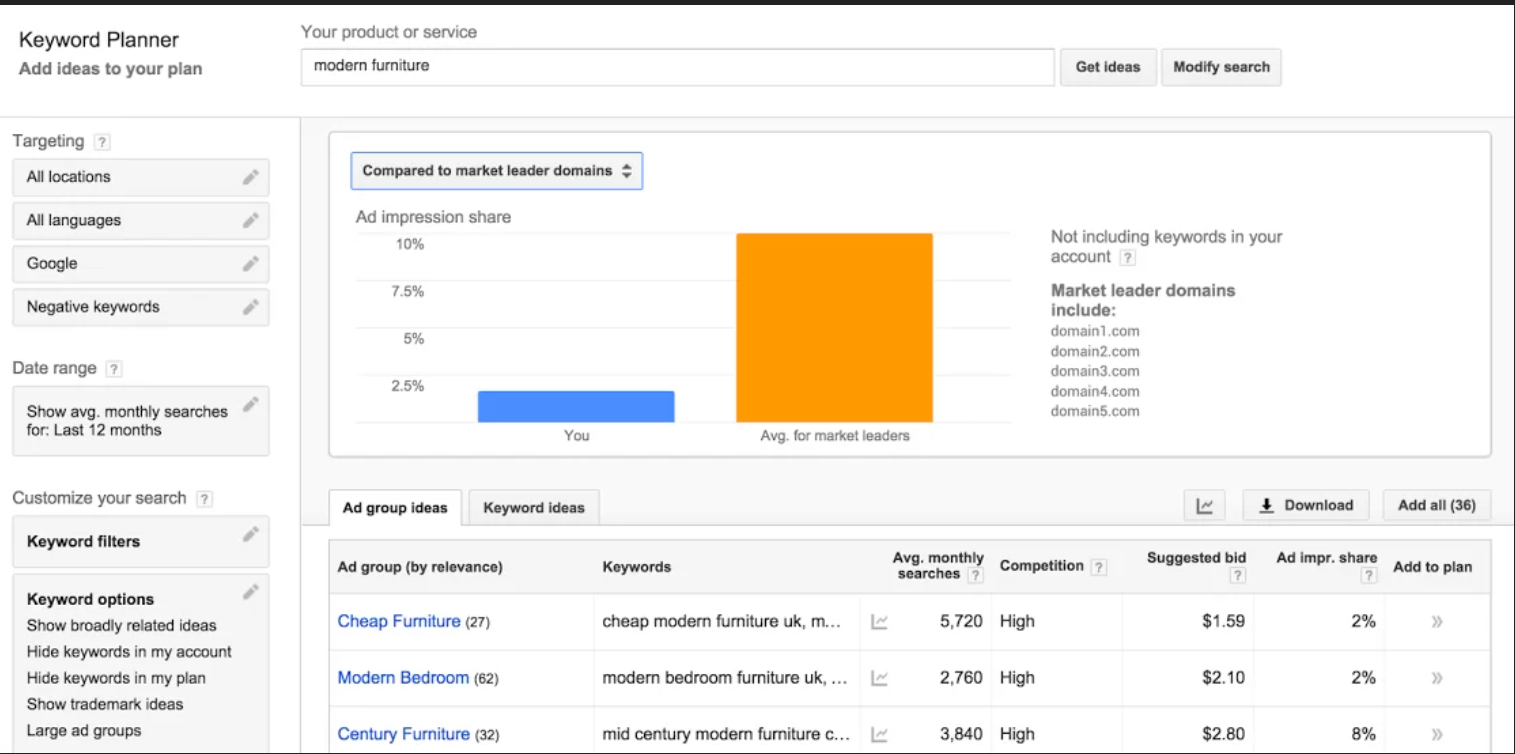
Finding Keywords: Open Tools → Planning → Keyword Planner → Discover New Keywords. Enter your core service (e.g., “carpet cleaning”) and set the geography to your target area. The tool will return a list with search volumes and bid ranges.
Supplement this with a ChatGPT prompt. Try: “I am a [service] in [city]. I want to advertise to people looking for [service] in [city]. These would be residential customers. Give me high-intent transactional keywords only.” The output will organize keywords into primary, pricing, urgency, and service-specific categories. Start with the primary transactional group.
Match Types — This Is Where Budgets Die:
Google offers three match types. As a beginner, you should only use two:
- Exact Match
[carpet cleaning Fort Wayne]— Your ad shows only for this exact query or very close variants. Tightest control. - Phrase Match
"carpet cleaning Fort Wayne"— Your ad shows for queries that include this phrase in order, with words before or after. Moderate control. - Broad Match
carpet cleaning Fort Wayne— Your ad shows for anything Google’s AI considers loosely related. Do not use this.
Broad match is the #1 reason beginners waste money. I’ve seen carpet cleaning ads trigger for “Bissell carpet cleaner reviews” because broad match decided a vacuum cleaner was “related.” That click costs you $3 and produces nothing.
Start with 8–15 keywords in exact and phrase match. You don’t need 500 keywords. If you can spend your full daily budget on 10 high-intent terms, you’re in a strong position.
Step 5: Responsive Search Ad Copy Framework
Google’s Responsive Search Ad format lets you upload up to 15 headlines and 4 descriptions. The algorithm then mixes and matches them to find the best combination.
Here’s the contrarian take: you do not need 15 headlines. Google’s “Ad Strength” meter will penalize you for having fewer, but Ad Strength is a cosmetic metric inside the interface. It does not affect your ad rank, your cost per click, or your campaign performance.
Five strong headlines outperform fifteen mediocre ones every time. Structure them across these angles:
- Intent Match — Mirror the search query directly: “Carpet Cleaning Fort Wayne”
- USP — What differentiates you: “Same-Day Service Available”
- Offer — Lower the barrier: “Free Online Quote in 60 Seconds”
- Trust — Remove risk: “100% Satisfaction Guaranteed”
- Brand — Your business name for recognition
For descriptions, write two distinct 90-character lines. One should expand on your offer. The other should reinforce trust or urgency.
Add at least four sitelink assets with descriptions. Sitelinks expand your ad’s real estate on the search results page and improve click-through rate. Link to your services page, about page, pricing page, and contact page.
Add four callout assets (short trust signals like “Licensed & Insured,” “Same-Day Service,” “Free Estimates,” “5-Star Rated”).
Skip lead form assets for now. They sound convenient but currently generate high volumes of spam submissions. Get your website form converting first.
If you’re dealing with ad copy that isn’t converting after two weeks and you don’t know what to test next, the problem is usually your headline angles, not your keywords.
Step 6: Budget Calculation Using Real CPC Data
Don’t pick a budget out of thin air. Use this formula:
Minimum Daily Budget = (Average CPC) × (10 clicks per day)
Here’s how to find your average CPC:
- Open Keyword Planner and enter your top 3–5 keywords.
- Look at the Top of Page Bid (Low Range) and Top of Page Bid (High Range) columns.
- Average the two numbers for each keyword, then average across all keywords.
For our carpet cleaning example in Fort Wayne, Indiana:
- “Carpet cleaning” → Low: $0.64, High: ~$3.00 → Average: ~$1.80
- “Carpet cleaning Fort Wayne” → Low: $2.00, High: $6.50 → Average: ~$4.25
- Blended average across target keywords: ~$3.00 per click
At $3.00 per click × 10 clicks per day = $30/day minimum. I’d recommend starting at $50/day to give the algorithm enough data to optimize within the first two weeks.
The Google Ads campaign setup cost isn’t a fixed number. It scales with your industry’s CPC, your geographic competition, and your conversion goals. A local service business in a mid-size city might spend $1,500/month. A competitive SaaS company bidding on enterprise keywords might need $15,000/month to see meaningful data.
Post-Launch: Device Exclusions and Negative Keywords
Your campaign is live. Two settings you couldn’t configure during the initial build need immediate attention.
Tablet Exclusion: Go to Insights & Reports → When and Where Ads Showed → Devices. Find “Tablets” and set a bid adjustment of -100%. This tells Google to never show your ads on tablets.
Why? Across accounts managing hundreds of thousands in monthly spend, tablets consistently deliver the lowest conversion rates and the highest accidental-click rates. The screen size creates misclicks, and the user intent on tablets skews toward browsing, not buying. Eliminate the variable. Re-enable tablets later only if your campaign is already profitable and you want to test incremental reach.
Negative Keywords: Go to Keywords → Negative Keywords and immediately add terms you know are irrelevant. For our carpet cleaning campaign:
- “Bissell” (a vacuum brand, not a service)
- “rent” (people looking to rent a machine, not hire a cleaner)
- “used” (people shopping for secondhand equipment)
- “DIY” (do-it-yourself searchers)
- Out-of-area city names (e.g., “Indianapolis” if you only serve Fort Wayne)
Ask ChatGPT for a negative keyword list specific to your industry. The prompt: “I run a [service] business in [city]. Give me 20 negative keywords that would trigger irrelevant clicks for my Google Ads campaign.” Add the obvious ones immediately and review your Search Terms report weekly to catch new irrelevant queries.
How Much Does Google Ads Cost Per Click for Small Businesses?
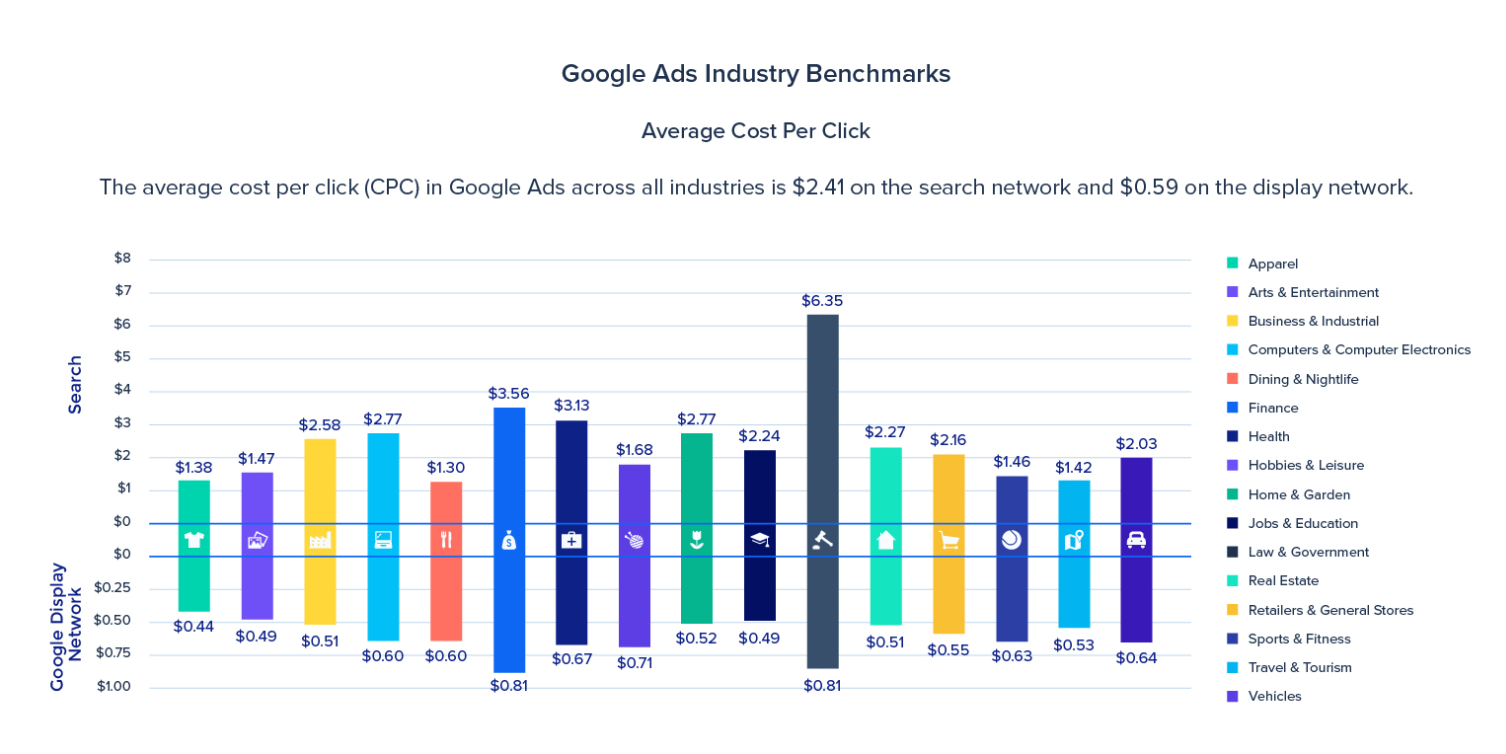
The Google Ads cost per click in 2025 varies dramatically by industry, geography, and keyword intent. Here are realistic benchmarks based on current Keyword Planner data and live campaign performance:
| Industry | Average CPC (Low) | Average CPC (High) | Typical Monthly Budget |
|---|---|---|---|
| Local Services (cleaning, HVAC, plumbing) | $1.50 | $6.00 | $1,000–$3,000 |
| Legal (personal injury, family law) | $5.00 | $50.00+ | $5,000–$20,000 |
| B2B SaaS | $3.00 | $15.00 | $3,000–$10,000 |
| E-commerce (retail) | $0.50 | $3.00 | $1,500–$5,000 |
| Real Estate | $1.00 | $7.00 | $1,500–$4,000 |
| Healthcare / Dental | $2.00 | $8.00 | $2,000–$6,000 |
The key variable is intent. A keyword like “what is carpet cleaning” (informational) might cost $0.30 per click but convert at near zero. “Emergency carpet cleaning Fort Wayne” (transactional) might cost $6.50 per click but convert at 15–20%. The expensive click is almost always the cheaper customer acquisition.
If you’re evaluating whether to manage campaigns yourself or hire help, Google Ads management services pricing typically ranges from $500–$2,000/month for small accounts or 10–20% of ad spend for larger budgets. The break-even point for hiring an agency is usually when your monthly spend exceeds $5,000 and the cost of your own learning curve outweighs the management fee.
Frequently Asked Questions
How much should I spend on Google Ads as a beginner?
Start with $30–$50 per day, which should generate at least 10 clicks daily in most local service industries. Calculate your specific number by finding your average CPC in Keyword Planner and multiplying by 10. Don’t scale your budget until you’ve accumulated at least 30 conversions and can calculate a reliable cost per acquisition.
How long does it take for Google Ads to start working?
Your ads can start showing within 24 hours of approval, but meaningful conversion data takes 2–4 weeks and roughly 100+ clicks. The Max Conversions bidding algorithm needs approximately 30 conversions to exit its learning phase and stabilize your cost per acquisition. Expect the first two weeks to be the most expensive.
Should I use Performance Max or Search campaigns?
Start with Search campaigns. Performance Max bundles Search, Display, YouTube, Gmail, and Discover into a single automated campaign with minimal transparency into where your budget is actually going. It works well for established accounts with rich conversion data, but it will burn a beginner’s budget across low-intent placements before the algorithm learns your audience.
What are negative keywords and why do they matter?
Negative keywords are terms you tell Google to exclude from triggering your ads. If you sell carpet cleaning services and someone searches “Bissell carpet cleaner reviews,” a negative keyword on “Bissell” prevents your ad from showing — saving you the cost of a click from someone who wants to buy a vacuum, not hire a cleaner. Add 10–20 obvious negatives at launch and expand weekly from your Search Terms report.
If you’ve made it this far, you already know more about Google Ads campaign setup than 90% of beginners who just click “Next” through every default screen.
Are you launching your first campaign this week, or are you trying to fix one that’s already bleeding money?
Bookmark this page so you can reference each step during your actual build. Share it with a business partner who’s about to make the same default-settings mistakes. And if you want a deeper breakdown of the bidding strategies that scale campaigns past the beginner phase, [INTERNAL LINK: “read the full bidding strategy masterclass” → link to: /google-ads-bidding-strategies].
AUTHOR BIO: Solomon Nnamdi Eke-Osih, Professional Media Buyer — a Google Ads agency managing millions in monthly ad spend across 100+ client accounts. He specializes in campaign architecture for small businesses and has personally audited over 500 beginner ad accounts.
